Dev, Staging, and Main Git Workflow
This guide explains how to work in projects that use separate dev, staging, and main branches with environment-based deployments.
This workflow is intended for WordPress projects where changes are developed in Git, reviewed through pull requests, and promoted through environment branches.
Branch Overview
| Branch | Purpose | Deployment Behavior |
|---|---|---|
dev |
Active deployment and internal testing | Automatically deploys to the dev server |
staging |
Review, QA, and approval before production | Automatically deploys to the staging server |
main |
Production-ready code | Production deployment is handled by manually running the deploy workflow |
NASPO ValuePoint Implementation
NASPO ValuePoint follows the branch model described above: dev deploys to development, staging deploys to staging, and production deployment from main is manual. For NVP implementation details, including GitHub Environments, Tailscale, SSH, rsync, and .deployignore behavior, see Deployment Pipelines.
Environment Flow
flowchart TB
  Feature["Feature branch"] -->|"Pull request"| Dev["dev branch"]

  Dev --> DevDeploy{{"GitHub Actions<br/>auto deploy"}}
  DevDeploy --> DevServer["Dev server"]

  Dev -->|"Pull request"| Staging["staging branch"]

  Staging --> StagingDeploy{{"GitHub Actions<br/>auto deploy"}}
  StagingDeploy --> StagingServer["Staging server"]

  Staging -->|"Pull request</br>*REVIEW REQUIRED*"| Main["main branch"]

  Main --> ProdDeploy{{"Manual deployment"}}
  ProdDeploy --> Production["Production server"]
General Workflow
Most changes should follow this path:
- Create a feature branch.
- Merge the feature branch into
dev. - Confirm the change on the dev server.
- Promote
devintostaging - Confirm the change on the staging server.
- Promote
stagingintomainwith required review. - Deploy production manually.
- Confirm the change on the production server.
Do not commit directly to environment branches
Avoid committing directly to dev, staging or main. Use pull requests so changes can be reviewed and branch history stays clear.
Creating a Feature Branch
Feature branches should usually be created from dev.
Use short, descriptive branch names.
Examples:
feature/update-footer-links
feature/add-alert-banner
fix/contact-form-styling
docs/update-deployment-notes
Working Locally
Make changes locally, then commit them to the feature branch.
git status
git add .
git commit -m "Update footer links"
git push origin feature/update-footer-links
Open a pull request into dev.
Deploying to Dev
When a pull request is merged into dev, GitHub Actions automatically deploys the dev branch to the dev server.
After the deployment finishes:
- Open the GitHub Actions run.
- Confirm the workflow completed successfully.
- Check the dev site.
- Confirm the expected change is visible.
- Check for any obvious errors.
Dev is for integration testing
The dev environment is where active changes are combined and tested before being promoted to staging.
Promoting Dev to Staging
When the change is ready for review, open a pull request from dev into staging.
After the pull request is reviewed and merged, GitHub Actions automatically deploys the staging branch to the staging server.
After the deployment finishes:
- Open the GitHub Actions run.
- Confirm the workflow completed successfully.
- Check the staging site.
- Confirm the expected change is visible.
- Check for any obvious errors.
- Complete any required QA or stakeholder review.
Staging should represent the next production release
The staging branch should stay close to what is expected to go live next. Avoid treating staging as a second development branch.
Promoting Staging to Main
When staging has gone through QA and been approved, open a pull request from staging into main.
This time, although it is not explicitly enforced in GitHub, require at least one reviewer on the pull request. This is the last chance to have code changes reviewed before going to the production server, so it is useful to get at least one more set of eyes on it.
After the pull request is reviewed and merged, the code on main represents the production-ready version of the project.
Merging to main does not automatically deploy production
In the workflow, production deployment is manual. Confirm the production deployment process before assuming code on main is live.
Production Deployment
Production deployment is handled manually after staging has been merged into main.
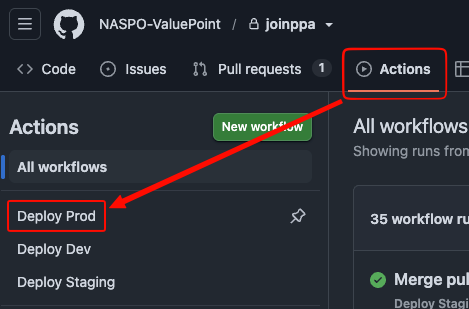
To deploy from main to the production server, go into the 'Actions' tab of the repository, and then click into the 'Deploy Prod' workflow in the sidebar.
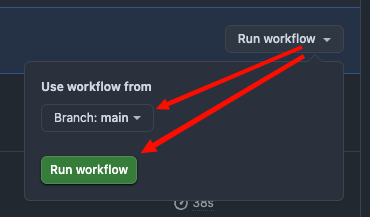
Click into 'Run workflow' on the right, make sure that the main branch is selected and click the green 'Run workflow' button.
After deploying production:
- Confirm that the workflow completed successfully.
- Check the production site.
- Confirm the expected change is visible.
- Check for obvious errors.
- Notify stakeholders.
- Update any relevant documentation.
Handling Hotfixes
A hotfix is a production-focused change that needs to move faster than the normal development flow.
Use hotfixes carefully.
A typical hotfix flow:
- Create a hotfix branch from
main. - Apply the fix.
- Open a pull request into
main. - Manually deploy production.
- Bring the hotfix back into
staginganddev.
Example:
After the hotfix is merged into main, bring it back into the lower branches.
Preferred method:
main -> staging
staging -> dev
Alternatively, cherry-pick the hotfix commit into staging and dev.
Do not leave hotfixes stranded on main!
If a hotfix is only applied to main, the fix may be overwritten or lost in a future promotion. Always bring production hotfixes back into staging and dev.