Add a New Server to Tailscale
This guide explains how to add a new server to the NASPO Tailscale tailnet.
Purpose
Servers should be added to Tailscale so authorized users and automation tools can connect to them over the private tailnet instead of relying on public network access.
This is especially useful for development, staging, deployment automation, and administrative access.
Prerequisites
Before starting, confirm that you have:
- SSH access to the server
- Admin access to the Tailscale admin dashboard
joinppa-devjoinppa-stagingjoinppa-prod
tag:joinppa-devtag:joinppa-stagingtag:joinppa-prod
1. Choose the Server Name, Tag and Access Scope
Before creating an auth key, decide how the server should be represented in Tailscale. Generally, the server name should be consistent with the established pattern of
{domain}-{env, staging, or prod}

# Example: A development server for https://www.joinppa.org
joinppa-dev
Create a new tag from the Tailscale admin dashboard by going to Access controls at the top and then toggling into JSON editor mode.

Now we need to create a tag for the new server. Inside the JSON editor for Access controls, look for the tagOwners object and add the new tag using existing tags as a reference.
"tagOwners": {
  // GitHub Actions runner CI deployment tag
  "tag:ci": ["autogroup:admin"],

  "tag:joinppa-dev":     ["autogroup:admin"],
  "tag:joinppa-staging": ["autogroup:admin"],
  "tag:joinppa-prod":    ["autogroup:admin"],
},
Next, we need to actually grant access to devices that use the new tag. Inside the JSON editor for Access controls, look for the grants object and add the new tag to each of the nested objects found there.
{
  "src": ["autogroup:admin"],
  "dst": [
    "tag:joinppa-dev",
    "tag:joinppa-staging",
    "tag:joinppa-prod",
  ],
  "ip": ["*"],
},
{
  "src": ["tag:ci"],
  "dst": [
    "tag:joinppa-dev",
    "tag:joinppa-staging",
    "tag:joinppa-prod",
  ],
  "ip": ["tcp:22"],
},
Save your changes!
Don't forget!
Be sure to add the tag into both of these objects nested in the grants object. The first object allows admin users to connect with the defined tags and the second object allows our GitHub CI to connect with the defined tags.
2. Create the Tagged Auth Key
In the Tailscale admin dashboard, create a new auth key for the server by going into Settings at the top and then Keys in the sidebar. Click on Generate auth key.... Copy the key for use in an upcoming step.
Recommended settings:
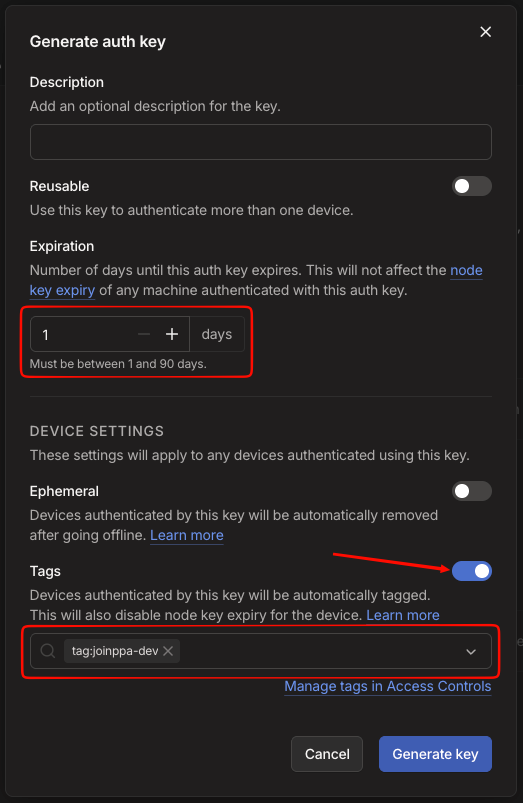
Use a specific tag for each server or environment. Avoid vague tags like tag:server unless the access policy is intentionally shared across many servers.
3. Install Tailscale on the Server
Connect to the server using the normal public SSH method.
Then, install Tailscale:
Confirm that Tailscale is installed:
4. Authenticate the Server
After Tailscale is installed, authenticate the server using the tagged auth key created in the Tailscale admin dashboard.
sudo tailscale up \
  --auth-key="PASTE_AUTH_KEY_HERE" \
  --hostname="SERVER_NAME" \
  --accept-dns=false \
  --shields-up=false
Now check the tailscale status on the server:
Confirm that:
- The server appears in the tailnet
- The hostname is correct
- The expected tag is applied
- The server has a Tailscale IP address
- There are no obvious authentication or connectivity errors
You should see something like this:
100.98.59.124   joinppa-dev          joinppa-dev.tailf5b47b.ts.net  linux
100.64.0.10     admin-workstation    operator                       macOS
You can also check the assigned Tailscale IP directly with:
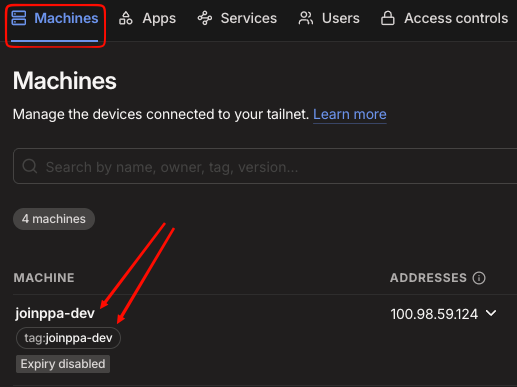
We will also want to confirm that the new machine appears in the Tailscale admin dashboard as well. Navigate to the Machines tab at the top and check for the new machine.
5. Test Connectivity
From your local machine, confirm that you are connected to Tailscale:
Then try to reach the server by its Tailscale hostname:
6. Reboot the Server
Reboot the server to confirm that Tailscale survives a restart:
Wait for the server to come back online, then run through the connectivity test in step 4 again.